
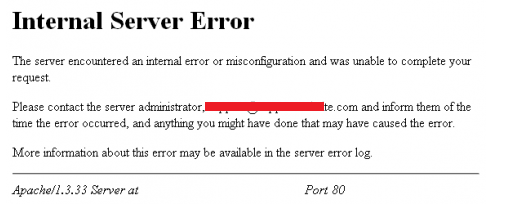
Finding a 500 internal server error in WordPress is not a pleasant sight. As an owner, getting an internal server error is pretty disheartening. However, the error is just like other errors you get on your WordPress website.
It can be fixed. But, the real issue happens when newbies encounter the 500 internal server error. Also, the error doesn’t provide any extra information to the user.
In this article, we will list the way you can fix the 500 internal server error in WordPress. However, before we start, let’s try to understand why the error happens in the first place.
The causes of internal server error in WordPress
To dive deep into the topic, we first need to get a proper understanding of why the error occurs in the first place. Until now, you have understood that the error has something to do with the server itself. This means that an error has occurred on the server side where the website or the application is hosted.
It is much easier to understand from a user’s perspective. For example, a user requested a website or a resource from your site. When he/she clicks on a resource (image, video, etc.) or request a URL from the website. In that case, it will query the server and if the server fails to answer it correctly, the 505 internal servers come up.
How to Fix the 500 Internal Server Error
0. Server log file
If you are a techie, you already know what a log file is. A log file is a document or file which records everything that the server goes through. It can be a successful execution of a command, a warning or an error. This makes log files extremely useful for error detection. You can find error log files in your website root directory.
It should be turned on before you can use it. The guide on Snapcreek is useful and you should follow it in case you are wondering how to turn it on. Alternatively, you can follow Kinsta’s guide on error logs.
1. Backing up your WordPress server
The first step to solve the website is to backup your WordPress server. Server-side errors are generally not in your hand and it mostly a hosting issue. Before you start solving the problem, backup your site. This will remove any issues that can come in when an engineer or hosting try to address the issue. Also, server errors can also lead to significant problems later on. To ensure that no further damage is done to your website, backup is required.
2. Fixing the .htaccess
WordPress offers a big ecosystem. It has plenty of plugins and themes that you can download and use. However, sometimes these plugins create conflicts with the installation. This can lead to the corrupted .htaccess file.
For the uninitiated, .htaccess file contains the website configuration.
You can gain access to the file by going through the FTP or cPanel provided to by your hosting. The .htaccess should be within the root directory of your WordPress installation. It should be in a similar folder with wp-content, wp-includes and wp-admin
Before you start checking it, we recommend remaining it to .httaccess_old or something that will help you identify the original .htaccess file.
Once you have backed up the file, it is now time to get it fixed. You may also want to check if the site is fixed after the renaming of the .htaccess file as the hosting will try to create a fresh .htaccess file for your WordPress installation. If it gets fixed, congrats! Otherwise, keep reading.
If you go to the WordPress Codex webpage, you will find different “.htaccess” configurations. Pick the one that fits your website description. For example, you are using WordPress 3.5 and above, then you have to use the following code.
RewriteEngine On
RewriteBase /
RewriteRule ^index\.php$ – [L]
# add a trailing slash to /wp-admin
RewriteRule ^([_0-9a-zA-Z-]+/)?wp-admin$ $1wp-admin/ [R=301,L]
RewriteCond %{REQUEST_FILENAME} -f [OR]
RewriteCond %{REQUEST_FILENAME} -d
RewriteRule ^ – [L]
RewriteRule ^([_0-9a-zA-Z-]+/)?(wp-(content|admin|includes).*) $2 [L]
RewriteRule ^([_0-9a-zA-Z-]+/)?(.*\.php)$ $2 [L]
RewriteRule . index.php [L]
Save the new file and name it .htaccess. Once done, reload your website. Your website should be working again if the problem happened to be in the .htaccess configuration. If it is not fixed, try the other solutions listed below.
2. Increasing the PHP Memory Limit
The next thing that you can try is to increase the PHP memory limit. One of the reasons for the internal server error is PHP memory limit that makes the server crash and throws the error to the end user.
Increasing the PHP memory limit is also beneficial when you are having trouble while uploading images or large files. Some hosting also put a PHP memory limit.
So, how to increase it? It can be done by using any of the following mentioned methods.
1. PHP.ini file
2. wp-config.php file
3. functions.php file
4. .htaccess file.
Let’s quickly list the code that you need to put the respective files to increase PHP memory limit. Also, you only need to use one method. If it doesn’t work, then only try the other method.
PHP.ini
You can get access to PHP.ini file in the wp-admin directory.
memory_limit = 256M
upload_max_filesize = 256M
post_max_size = 256M
file_uploads = On
WP-Config
WP-Config.php can be accessed through the root directory of your WordPress installation. All you need to do is copy the code below into the file.
define(‘WP_MEMORY_LIMIT’, ’256M’);
ini_set(‘post_max_size’, ’256M’);
ini_set(‘upload_max_filesize’, ’255M’);
Functions file
Functions file can also be accessed through the root directory. Once you find it, edit it and copy the code below to increase the PHP memory limit.
@ini_set(‘upload_max_size’ , ’256M’);
@ini_set(‘post_max_size’, ’256M’);
@ini_set(‘max_execution_time’, ‘300’);
.htaccess file
We already discussed how to get access to the .htaccess file. Once you edit it, copy the below code there.
php_value upload_max_filesize 256M
php_value post_max_size 256M
Note: You can also select 64M if you think that fits your requirement.
Changing the PHP memory limit ensure that you never get WordPress memory exhausted error. We recommend reading WPBeginner detail tutorial on the topic here.
If your problem is still not solved, keep reading as we are going to show more solutions below.
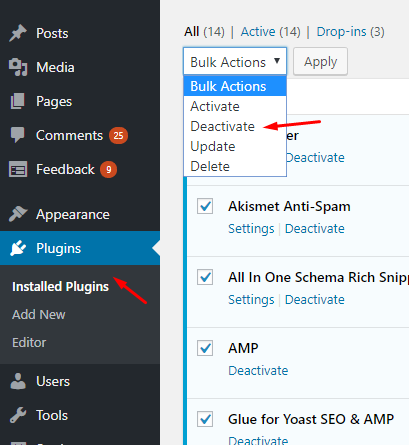
3. Find plugins that may be causing the problem
Plugins play a crucial role in making your site functional. However, some plugins do malfunction and can cause issues. Not only that, compatibility can be an issue when it comes to WordPress plugin. If a plugin is not compatible with another plugin(s), it can easily cause errors including the internal server error.
To troubleshoot, you first need to get into your WordPress dashboard. Once you are there, go to “plugins.” Now select all the installed plugins and then click “deactivate.”
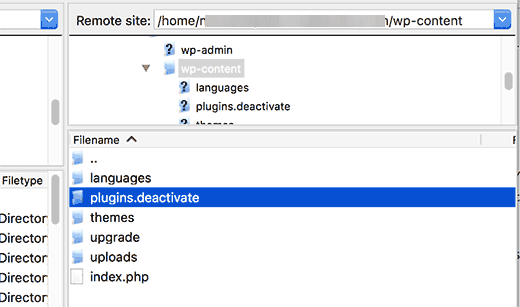
If you are not able to get into the dashboard, then you need to deactivate it by using FTP and then finding the plugin folder. Renaming the folder in which all the plugins are stored will disable all the plugins.
If your internal problem gets solved after deactivating the plugins, you are now sure that one of those plugins is acting up and is not working correctly. Now, all you need to do is find the one that is causing the issue.
To do so, activate one plugin one by one. When doing so, keep checking if your website is working correctly or not. If the site throws the 505 internal error after activating a specific plugin, you will know that this particular plugin was causing the issue.
All you now need to do remove the plugin and install an alternative for the said plugin.
4. Fresh install core WordPress files
If none of the methods worked, you now need to fresh install WordPress files. In this method, all you need to do is upload all the WordPress core files.
Also, there is nothing to worry as it will not remove or change your main website content. This method is used to get rid of the corrupted file and get the latest files into your WordPress installation.
To get started, you need to first go to WordPress.org. There you will see the option to download WordPress.
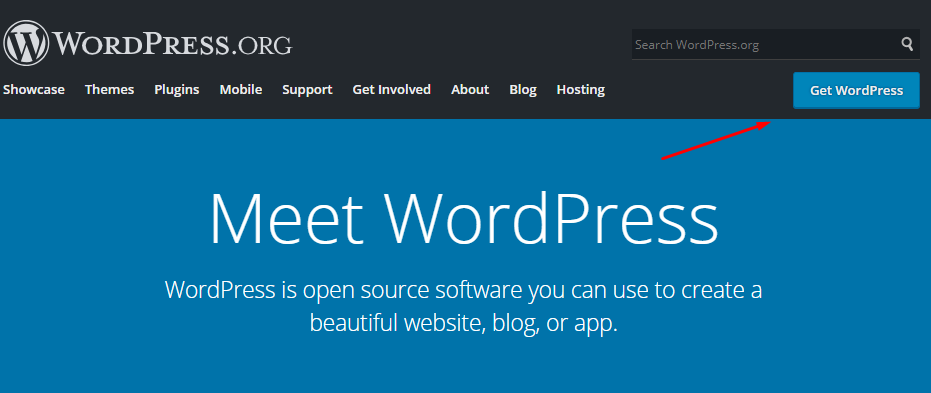
Click on “Get WordPress” to start downloading. Now, you need to use FTP client to upload it to the root of your WordPress installation. The folder will contain wp-includes, wp-admin and wp-content folders in it. Here, you need to upload the two folders, i.e., wp-includes and wp-admin to your root directory. You will get prompt to rewrite the existing files. Go ahead and do it.
Once the new files are upload, refresh your website and check if the error is fixed or not. If the error occurred due to corrupted core files, your website should be fixed by now.
5. Asking the hosting help
If none of the above methods worked, don’t lose heart. You can always ask for the hosting help. All you need to do is contact them ask them to solve it. It can be an issue from their side, and that’s why it is always a good idea to reach them.
Conclusion
This leads us to the end of the article. Internal server error is a standard error, and we hope that you can solve it with any of the methods mentioned above. So, which one worked for you? Comment below and let us know.


Very informative and useful article about Internal server errors. Thank you for sharing this.
wow really thanks for sharing this information with us. Very in-depth article about internal server.